
- Home - Mod Guides - Work Logs - Articles -
Work Log Page: [1] - [2] - [3] - [4] - [5] - [6]
Project Lament II: Hell's Illusion... (what's a dining room?)
Sequels as a rule suck, especially horror movie sequels. The HellRaiser series is one exception and there are sadly far too few others. HellBound is every bit as good as the first, or better in every way, depending on which fan you talk to. I am currently working to create a new HellRaiser themed PC far different than my first... there are those that have put their computers into puzzle boxes, I am going to put a puzzle box into the PC and hopefully entirely conceal the computer in the process. Dining rooms are over rated... so it begins, my HellRaiser sequel mod "Hell's Illusion".
| "The illusion scares me mommy..." he whimpered again through trembling lips, "Shut up Billy!", the crack of my backhand solidly connecting with tear soaked and tender flesh, "Just hurry up and finish solving the damned thing." |
The above takes care of the
obligatory beginning fiction regarding the back story of the mod, I don't know
why I feel the need to make the mods tie in with the mythos but I will admit
that I do enjoy writing bad fiction. I will continue the story as I go and
also illustrate parts of it as well, it will be a good excuse for a creativity
release while I stress out over the mod itself.
My mods run in two's so doing a sequel to my first
HellRaiser mod makes sense for more reasons than one. My MOBY cases were just
that, cases... modded to beat hell, but they were store bought. My Project
Lament: HellRaiser Cenobite PC would be considered a "found
object" mod, one where the hardware was installed into an existing
housing, though I did mod the mannequin like mad.
Which all leads up to the highest level of modding, where
the case is designed from the ground up and built from scratch... that is this
mod. I mentioned above that the PC will be entirely concealed from view, that
is not entirely true as I will have a switch slickly installed to flip the
lights and kill the illusion when needed. I already have the basic design
sketches finished and almost all of the hardware involved has already arrived.
Now I just need to finalize the design, buy some more Alum-angle, order
acrylic and then start modding this bad boy out. I don't know why but I like
fitting hardware into spaces smaller than intended, it is kind of like playing
Tetris or putting together a puzzle. The picture below was taken a couple of
weeks ago and does not show all the hardware going into this mod, so instead
of piling everything back up again I will show the parts up close in the next
couple of pictures instead.

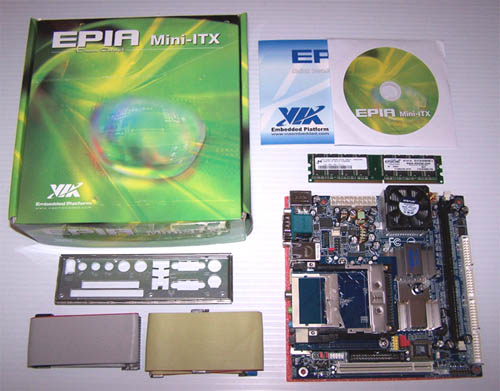
Below shows the Main board and memory. I am using an EPIA MII 12000, small in size but rich in features, the tiny main board is nothing short of amazing... and it supports LVDS, so as soon as I figure out exactly what is involved I plan to add a laptop screen to this mod. Since the EPIA MII supports up to 1GB of PC2100 DDR memory I bought a 1GB stick of Crucial that will be installed. You can see how small this board actually is when you compare it to size of the stick of RAM and IDE cable next to it.
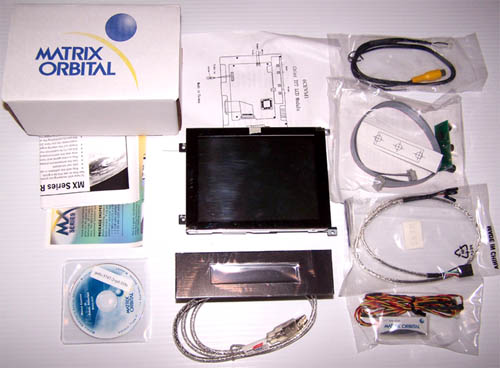
Next up is a CMG trademark mod, the 6" TFT LCD monitor shown below has been a staple of my last two mods and this will be no different... well, maybe a little different. I plan to stealth the monitor into the case so that it is not noticeable when the machine is off. Same deal with the Matrix Orbital MX222 shown, it all ties in with entirely hiding the hardware in this mod. The MX222 has temp probes, fan control and a three LED array for event monitoring... it will all be worked into the mod.
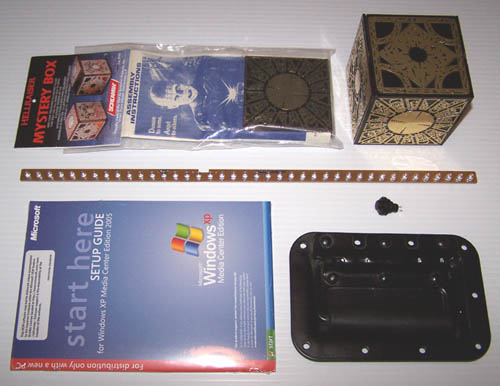
There will be a HellRaiser box inside this mod, along with the hidden hardware it will be the biggest part of the illusion. Below the box(es) in the pic below is a 40 red LED automotive brakelight, it will be worked into the case and serve as the mods lighting. The small SPST momentary switch is the same type that was used in my first HellRaiser mod, as is the handle shown below it. WindowsXP will be the OS for this system, I bought an OEM copy off NewEgg and though straight XP was cheaper, media center seemed to fit what I have planned better.
The hardware is all here, other than the different PSU I ordered and I will take final measurements and order the ACRyan Acrylpanel needed to construct the case soon. Until then enjoy a bit more of this mods back fiction...
| ACT 1 - Late night
caller.
Main street was already blocked off,
first day of fall and the trees were already starting to turn, the
view from the porch of the ferris wheel framed by flame orange and
coppery leaves looked almost surreal as the sun set. Fall carnival, a
happy time consisting of three days of greasy food, bad sideshow
attractions and some of the most rickety rides imaginable... fun. It
also meant the carnies were back in force, not a big deal to anyone
other than the local merchants getting shoplifted, but it also meant
that Ben would be back in town too.
There was a knock at the front door, knowing that the weather had shut
down the festivities early I had a good idea who it was calling at
this late hour, I had an equally good idea why he was calling, same as
it always was when fall rolled around. Against my better judgement I
unlocked and opened the door, just a crack with the chain still on.
Lightning flashed as he stood on the porch clutching a trash bag in
one hand, "Hello Jen" he said while staring down at his
feet, "Christ Ben, why are you here?". Standing in the rain
he looked up at me, wet red hair plastered against his forehead,
smiling with a slightly wild look in his eyes. I could tell he was
digging deep to find just the right thing to say, but instead of the
standard 'I missed you' line of wrong answer crap I was expecting he
simply asked "Do you have a toolbox?". |
I took final measuments
today and found that the full size HellRaiser puzzle box that I intended to
use was a hair too big for the mod, at 114mm corner to corner it left less
than 28mm from each edge, not enough space to work well for the illusion.
Enter HellraiserPuzzleBox.com.
first off, for the horror afficianado the site is way cool and secondly, if
you want or need an authentic HellRaiser puzzle box they have it. If you
checked out their site you would notice that the 2/3 scale (2") puzzle
box is out of stock. I contacted the owner and inquired as to whether they
would be getting the 2/3 boxes back in stock and he said no, but he is willing
to print out a few sheets of the panels for the 2/3 scale puzzle box so that I
can make this mod happen.
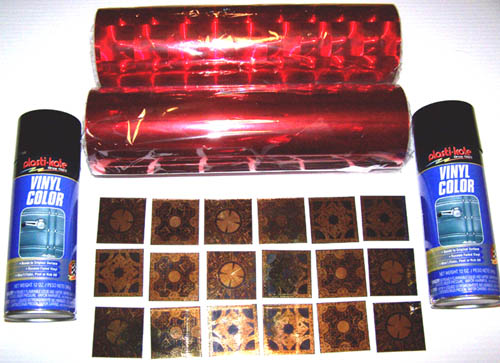
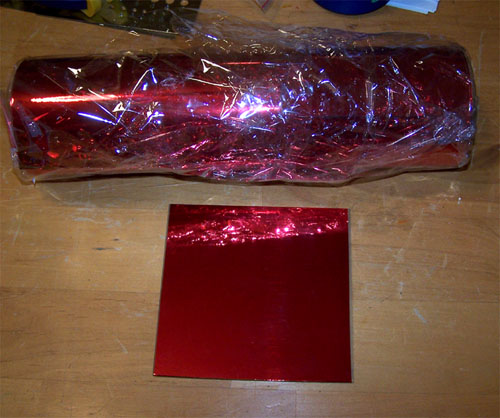
The
Puzzle Box Shop came through for me and instead of the two sets of box
panels I requested Kevin sent three, that will give me an extra chance at
building the box correctly and was an unexpected and pleasant surprise. Also
pictured below is a 12"x10' roll of cherry red chrome mirror metallized
vinyl, it is an adhesvie coated metallized PVC film, above it is a
12"x10' roll of Red Multiple Fresnel Lens Metallic Vinyl which may or may
not be used in the mod. Last but not least are a couple of cans of black vinyl
dye, it will be an important part of the external illusion.
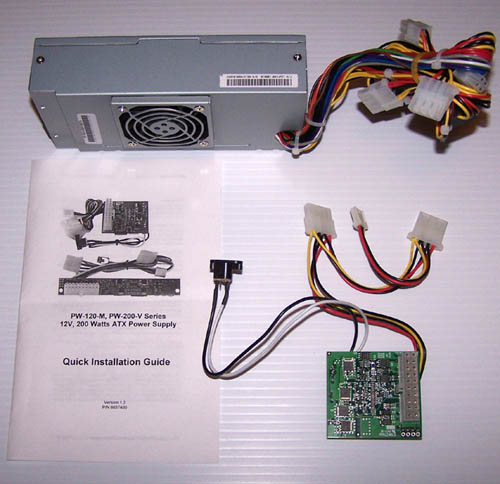
The PSU I had intended to use is shown at the top of the picture below, it is pretty small measuring only 7" long, but the PW-200 PSU is absolutely tiny in comparison. I will be losing 40W by using the PW-200 instead of the IN WIN PSU, but it is a fair trade off and 200W will be plenty for this system.
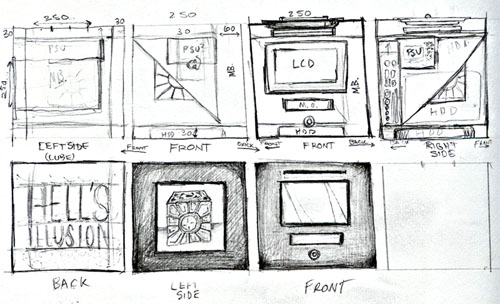
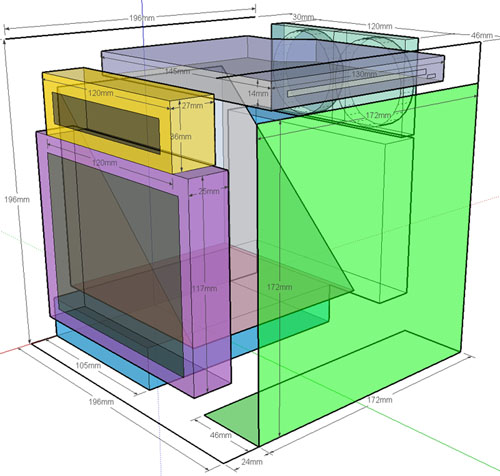
Ok, we have covered hardware and materials I plan to use for this mod but so far I have not shown anything regarding the actual design, mainly because I did not want to show exactly what I had planned for this mod too soon and spoil everything... and that was actually a good thing because it allowed me a little extra time to rethink certain aspects of it. It is hard to visualize a 3-D object and convert it to 2-D sketches. Below is an early layout design sketch, the placement of parts has changed a bit since I drew it, but you can see that it measured 250mm (or roughly 10") on each side of the cube... too big for my liking.
I decided that the biggest design problem was the technique I was using and hand sketching this mod was not going to cut it, having heard good things about the program Sketchup I downloaded their 30 day trial and started watching the tutotials. It only took an hour or so to get up to speed and I set to redesigning the whole thing with making it smaller in mind. Enjoy a bit more of the back fiction before I disclose the final(?) design in all its 3-D Sketchuppy goodness...
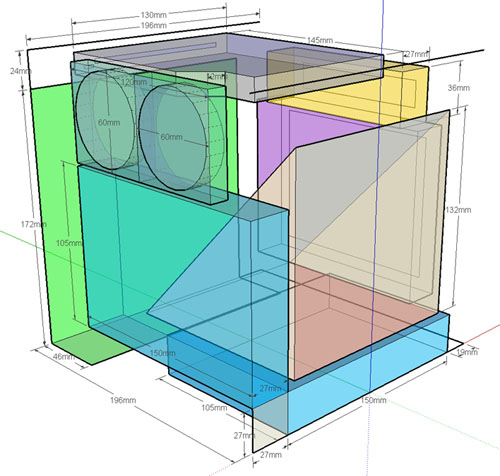
Sketchup, wow that's good stuff. I have never really used any type of design software before but I know it's not supposed to be this easy. I followed the work along tutorials and less than an hour later I was ready to begin designing my computer. I wound up shaving nearly two inches off each side as a result of using the software, here is my "almost" final 8"x8" design sketchup for the mod.
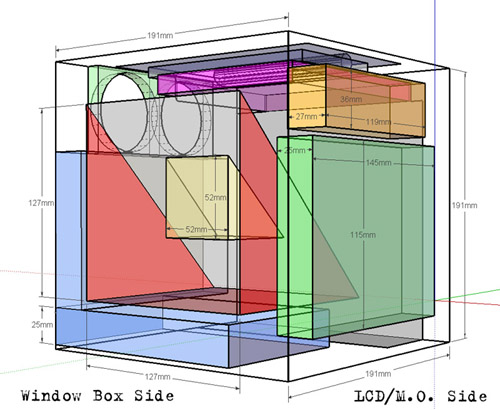
Below is the view from the other side, the Sketchup designs merely show component placement, the fun part will be connecting it all together... but I have a plan.
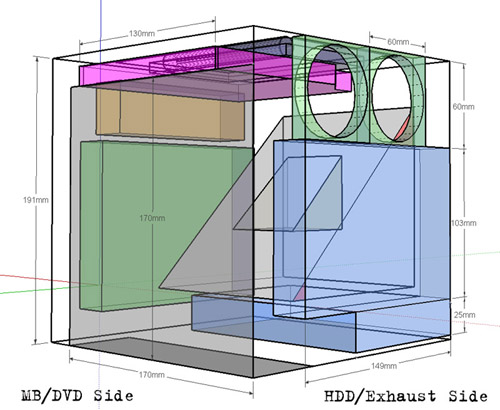
Now measuring around
8"x8" it will house two hard drives, a CDRW/DVD drive, a 6" LCD
monitor, Matrix Orbital, two 60mm fans, the Mainboard, a TV tuner plus the
lighting and illusion... much better. Enough with the planning, let the modding begin...
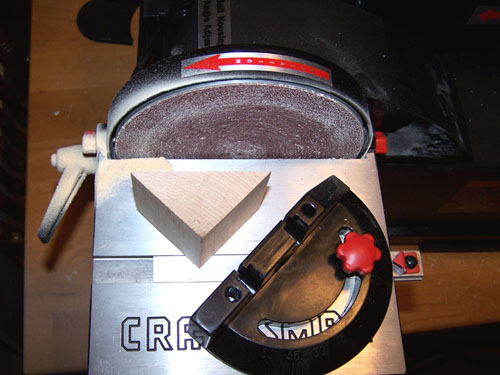
Since this mod is being built from the inside out I have to
start with the 1/2 wooden cube because it is the innermost part of this mod.
The first thing I did was fix the rough cut that using the hand miter box made
on the wooden cube, the table disk sander made short work of it.
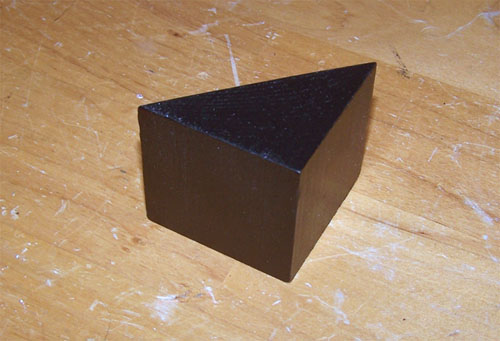
Next up a couple of coats of black enamel spray paint, nothing fancy as it will mostly all be covered up in the next part...
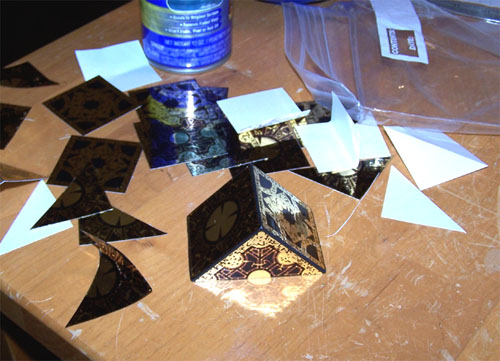
It was a really good thing that Kevin from The Puzzle Box Shop sent me three sets of panels because I wasted a bunch by trying to get the cut exact before I figured out that I was cutting the wrong panel in half. Below is the finished 1/2 puzzle box with the corrected panel placement.
Funny how things work out, I built and delivered a computer today to a very cool guy that just happens to own a laser cutter/engraver... he did me a solid and cut out the panels for the illusion section. Below also shows the 1/2 puzzle box atop the freshly cut 2-way mirror, it really looks like a full cube and is nearly seamless.
| ACT 2 - Unraveling
the puzzle.
He dried his
hair, threw the towel around his shoulders and sat down staring at the
small black box on the table. There was red lettering on one side that
read 'Hell's Illusion', it appeared to be a shadow box with a fancy
brass cube inside it but the way Ben was looking at the thing you
would have thought it held the cure for cancer. "Well," he
began, "about two months back I got promoted from the
'Tilt-A-Whirl' midway ride to the 'Chamber of Oddities" side show
attraction as a barker, it's nothing more than a tent with some
displays set up in it, mainly jars of glowy colored water and rubber
props. The only really good part about the new job is not having to
mop barf as often, but this black box was sitting over in the far
corner and I never really gave it a second look until this
afternoon". He looked up and continued, "Come to think of it
though, my first day running the 'Chamber' there was this guy that got
to talking about how he was a computer 'modder' and made all these
crazy custom machines, said he bought one of those fancy brass boxes
like what's inside this thing for cheap off ebay and was going to put
a computer inside of it, weird". His gaze returned to the box,
"Anyway, there was this older woman today that saw the thing and
told me that if I wanted to make a fast two grand I should call her
and she gave me this". Ben reached into his shirt pocket and
handed me a business card, on it was the name 'Dr. Bethany Chanard',
below that was the title 'Professor of Parapsychology' for the state
university and a couple of phone numbers. |
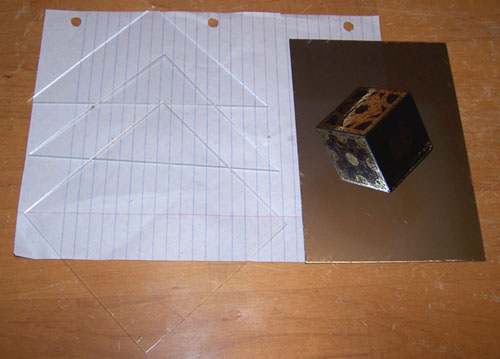
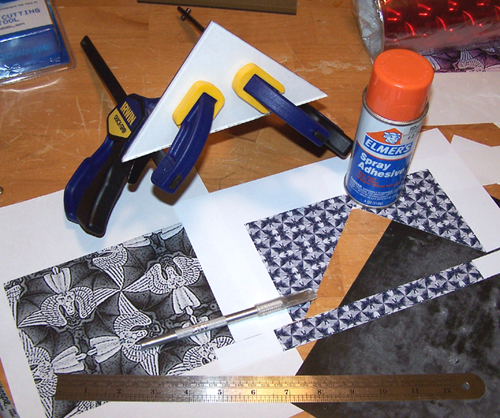
I concentrated on the side panels for the illusion section, since they will sit flush with the mirror it was necessary to find a pattern that was absolutely symmetrical. Once I finally found and Photoshopped the image I printed it out at high res onto some photo paper and cut it out with an X-Acto knife. I took the triangle pieces of laser cut acrylic and scuffed one side of them with 800 grit sandpaper so that the spray adhesive would have something to make proper contact with and applied the printed images. I then clamped both sides together to make sure that everything would adhere properly.
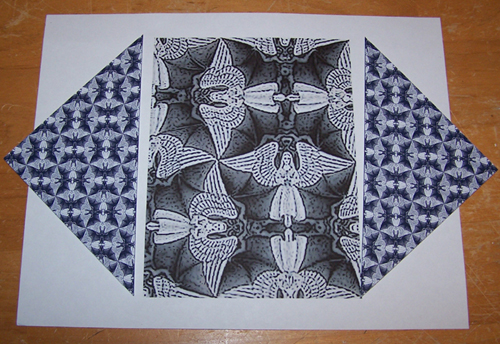
"Angel to some, demon to others"... MC Escher is awesome, serious props (even though it took an assload of image editing to make it look right), the below picture shows the two finished sides with a blow up of the original image in the middle. The Escher image just seemed to fit the theme and it also tied in with the illusion aspect of the mod, so win all around.
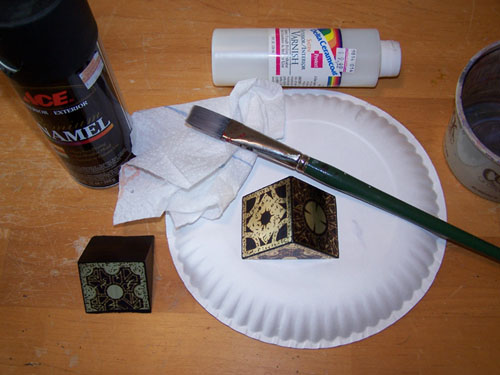
I had to add a layer of varnish to the puzzle box to keep the images from smearing, before I did though I tested it out on a practice piece... it worked well.
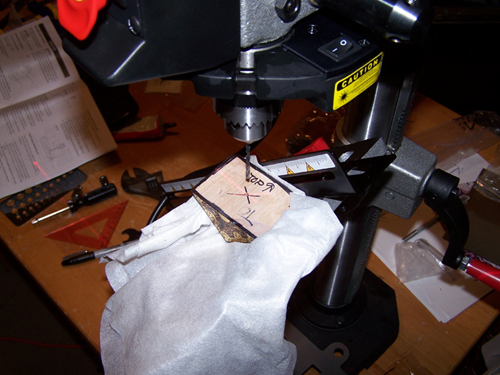
I set up my drill press and added a hole to the back of the puzzle box so that it can be screwed onto the mirror panel.
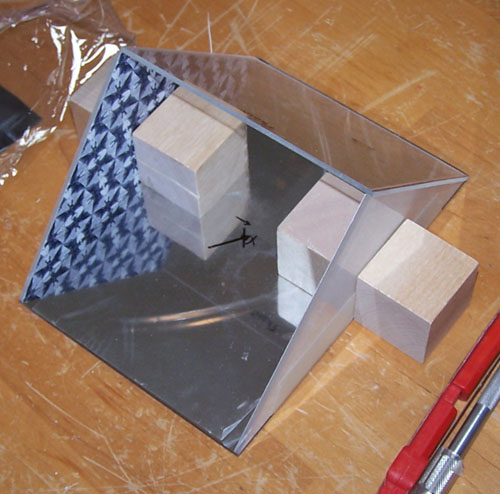
Below is the test fit of the acrylic panels, I used wood cubes to hold everything in place while I eyeballed it.
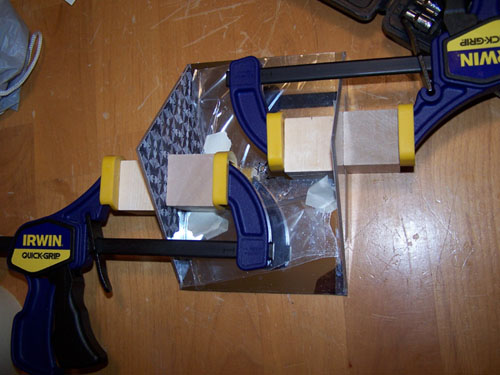
Once it all lined up I taped the panels together and also taped down the wood blocks on the inside edge to help hold everything together. The edges of the mirror panel were sanded with 80grit as was the connecting edge of each side, I also drilled a hole for the cube in the center of the mirror panel.
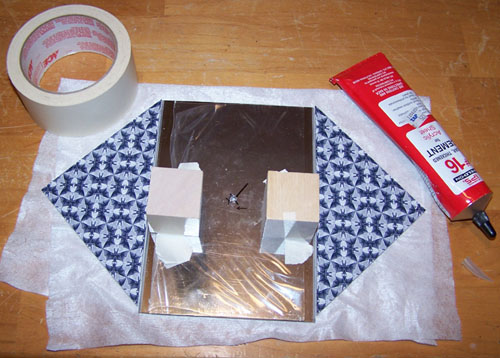
I ran a thin bead of Weld-On 16 across the edges and attached the side panels, clamped the whole shebang together until it set up and moved onto this next part...
The bottom panel of the illusion section is carefully covered in the red chrome vinyl stock, care was taken while applying the film so that it lined up well with no trapped air bubbles.
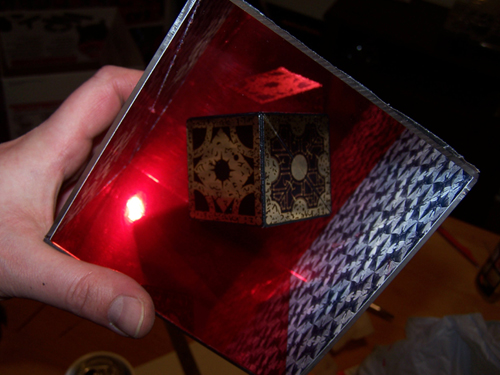
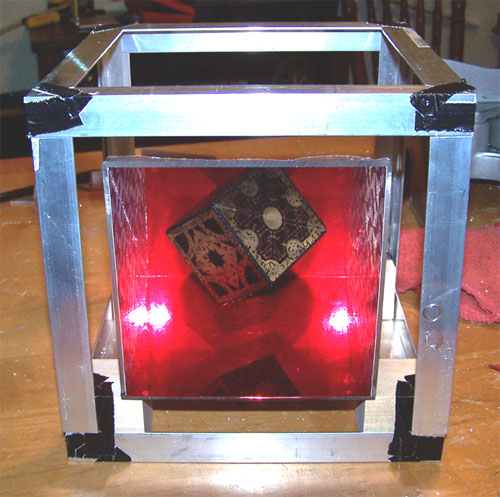
The bottom section was attached and below shows the completed illusion section of the mod, I still have a tiny bit of deatil work to do to it but for the most part it is done.
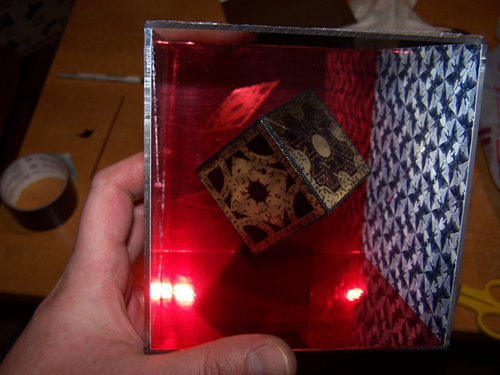
And another shot from a different angle, I like how the box is reflected inside on the red mirror chrome and that it came out measuring exactly to spec... the hard stuff is out of the way, now all that's left is to build the PC around it.
I did a little more modding today, before I got to it though I totally re-did the Sketchup design to remedy the niggling bits that bothered me... like the fact that I made no allowance for the thickness of the Alum-Angle that will be used for the frame work (stupid Sketchup noob).
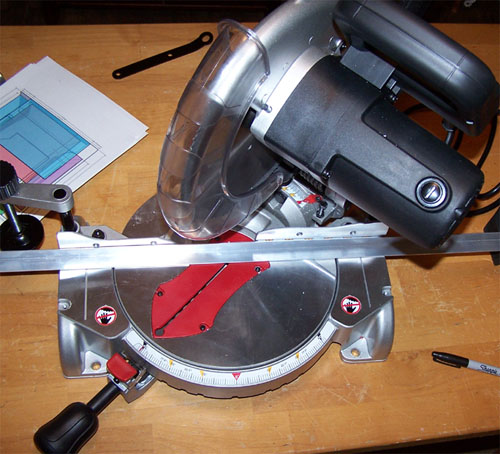
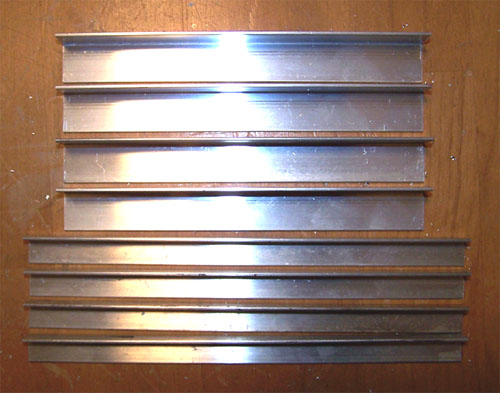
I set up my compound miter saw and using a 200 tooth blade cut some Alum-Angle pieces for the bottom framework...
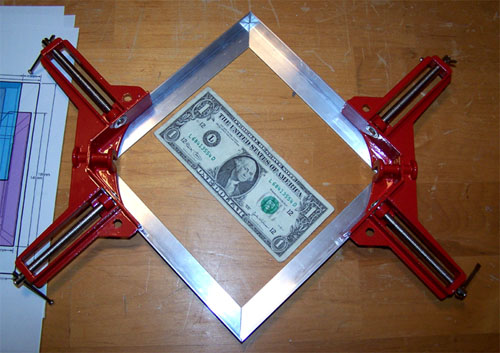
Below is the test fit of the bottom brace pieces, the adjoining edges will need to be sanded up a bit, but it all lines up really well so far. I put a dollar bill inside the bottom frame to show a size comparison, this mod is not going to be very big...
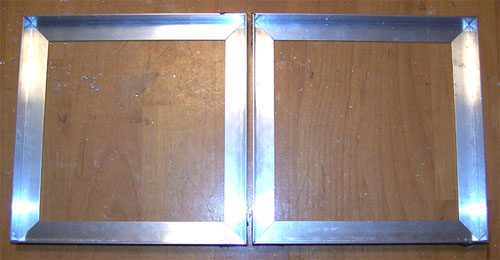
I made the top section of the mod, it is exactly the same as the bottom section...
I also cut the side edge pieces for the mod, the thinner pieces of Alum-Angle will sit to the inside and the thicker pieces will be the outer corner edges of the sides.
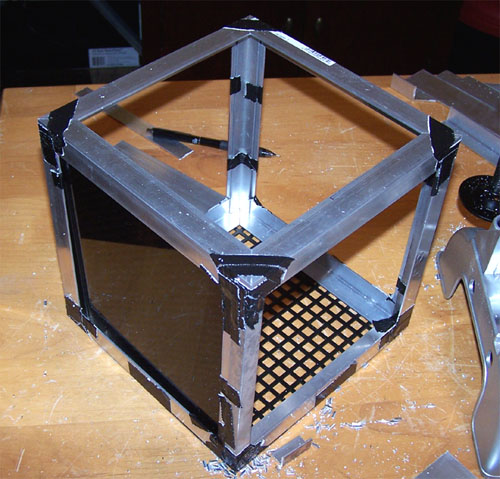
Here I am test fitting all the cut pieces together, I used wood cubes to hold the side inner braces in place and taped it all together.
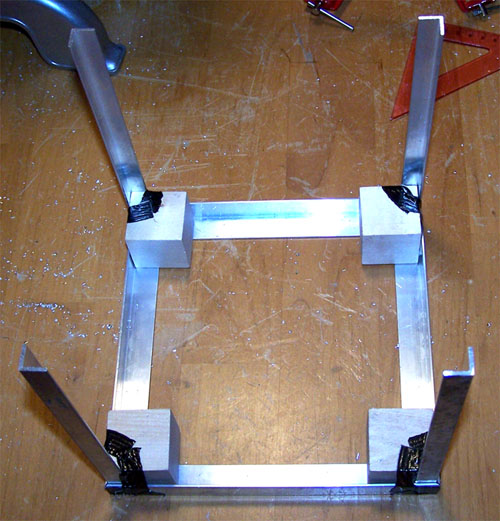
All the parts together that make up the main framing of the case, it is exactly 200mm x 200mm cubed...
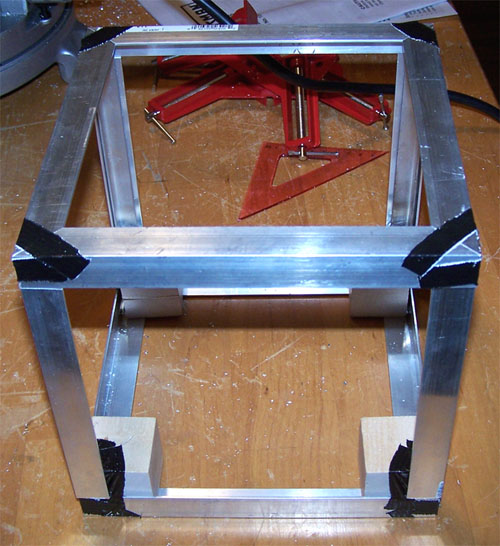
The following picture is a test fit of the illusion section within the frame.
The 12" subwoofer speaker grill has been sitting inside my mod closet for a while, I ordered it from All Electronics Corp. some time ago and did not have a mod in mind for it... until now.
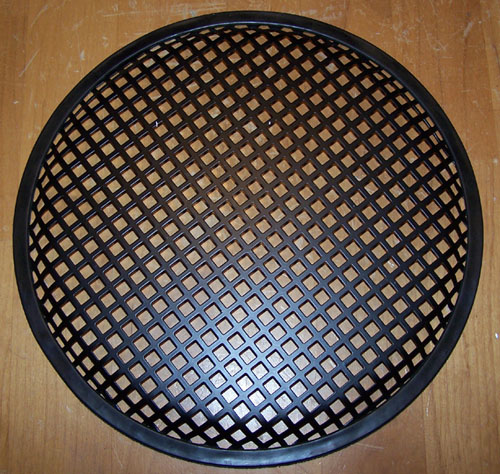
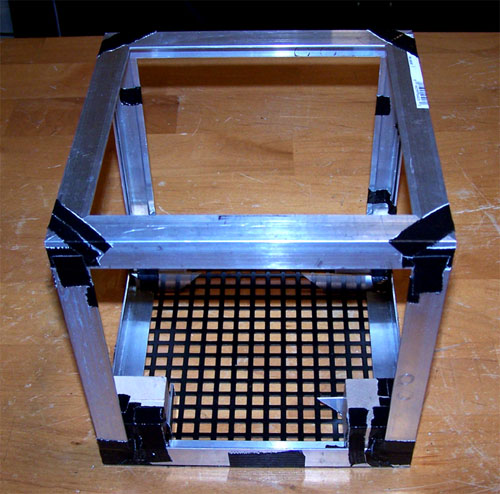
I used a nibbler to cut it to shape and then used a hammer to flatten the corner edges, it fits really nicely beneath the bottom frame.

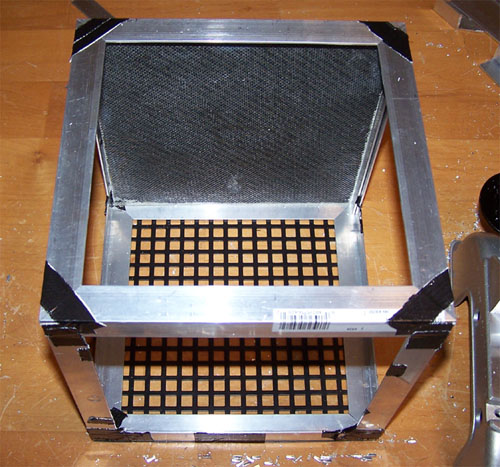
I also did a little fine tuning to the pieces that make up the top and bottom sections, I hit them all on the disk sander so that they are all exactly the same size, I also sanded down the edges of the bottom grill section. Below is the second test fit...
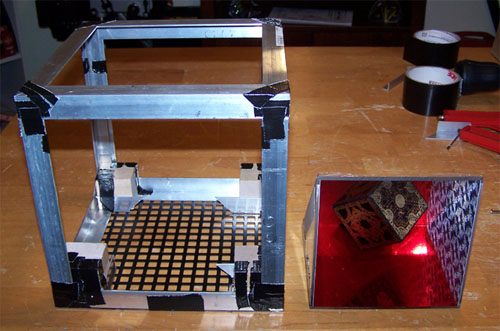
Here is the illusion section set up next to the final test fit frame section, I have to hit the hardware store for some wider Alum-Angle tomorrow so I can start placing the hardware.
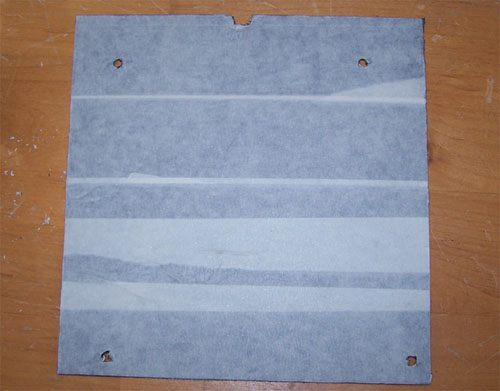
After making the bottom of the case I decided to work on figuring how best to mount the motherboard, then I remembered the sheet of scrap carbon fiber that my brother had given me.
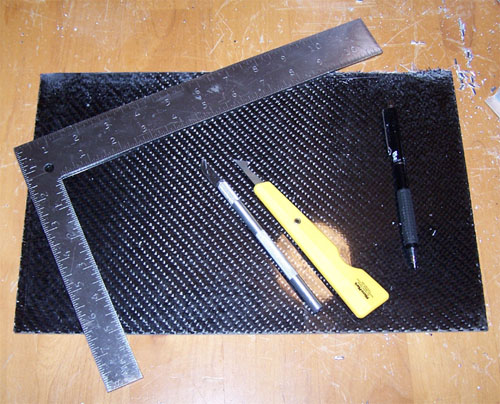
I measured and cut the carbon fiber to fit snugly within the inside edges of the cube, below is the test fit of the motherboard tray.
Here it is from the inside, the carbon fiber only looks good on one side and that side faces the outside...
Below is a test fit of the motherboard within the cube, it fits real nice...
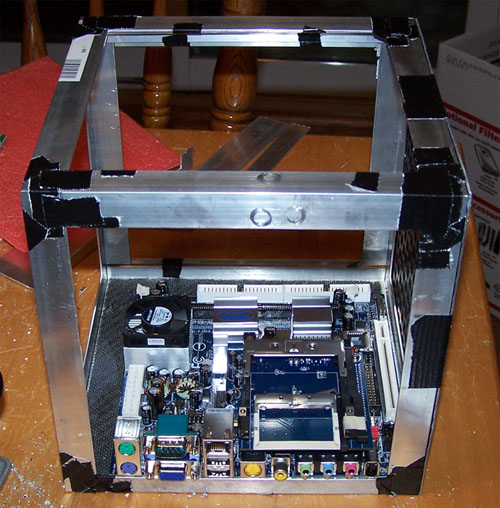
Talk about things falling into place, take a good look at the picture below because it is a fluke... it was not measured for or planned into the mod and I only put it in to find placement for the MB, but the rear panel cut-out fits perfectly within the side panel of the mod. Since it fits so nicely I have decided to use it, this may or may not affect placement of the CDRW/DVD drive... but I don't care, it's an omen.
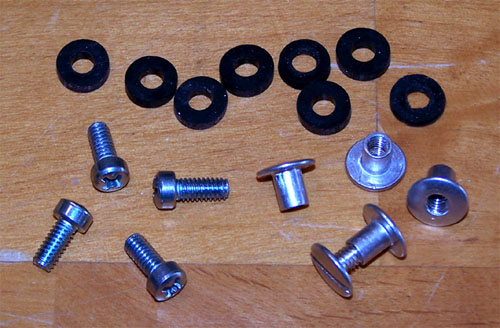
I masked off the shiny side of the carbon fiber and the mother board screw positions were marked onto the carbon fiber using a silver Sharpie marker. I drilled the holes using a 13/64 bit... why 13/64 you ask?
Because 13/64 is the diameter needed to allow an aluminum binding post to pass through. After days of thinking I finally decided the best way to mount the mother board to the tray would be to use the posts mainly because they are as thin as a single layer of Alum-Angle. Below shows the aluminum binding posts (of which I only need the female half), four filister screws and eight rubber grommets.
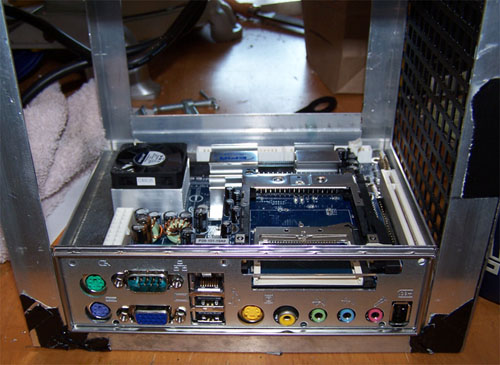
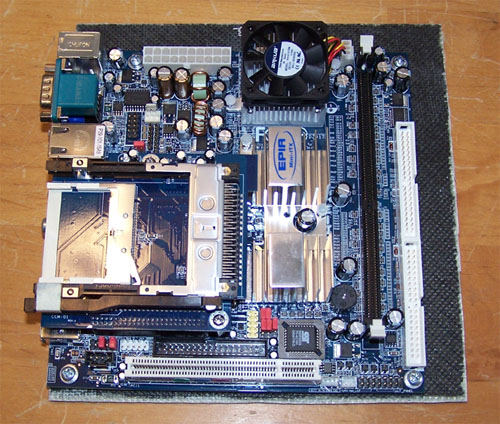
Here is the mother board installed onto the freshly made tray, it was placed into the case for a test fit and everything almost lines up. The screw in the lower left sits smack on top of an aluminum support that will have to be notched out, but I knew that before I even cut the carbon fiber so no big deal.
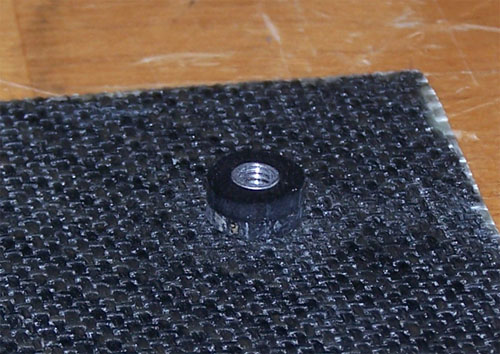
Below is a close-up of the mounting method, it is not set in stone and I have another idea I plan to test using nylon washers with the rubber grommets, but for now it is good enough.
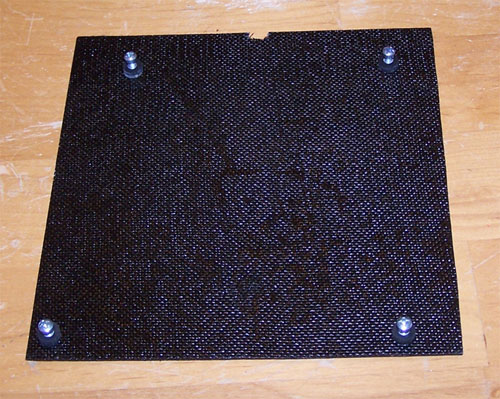
The backside of the mother board tray was pretty nasty looking, nothing that a couple coats of vinyl dye couldn't cure. The vinyl dye does double duty by preventing any light from shining back into the mod.
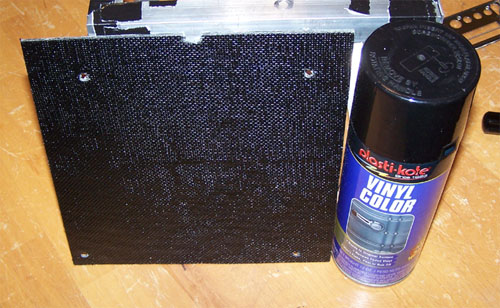
Below shows the back sides of the aluminum binding posts on the MB tray, I also made a notch at the top of the carbon fiber panel so that lighting can be wired into the back.
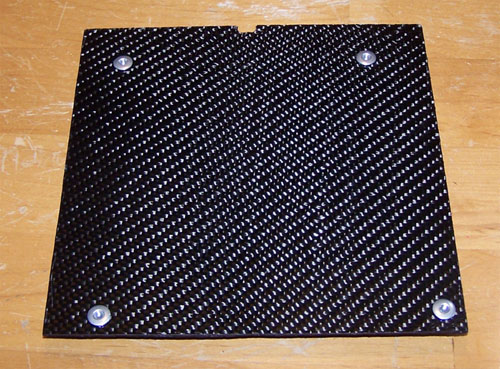
A shot of the finished vinyl dyed mother board tray with the binding posts, rubber grommets and filister screws.
- Hell's Illusion Work Log: PAGE 2 -
Work Log Page: [1] - [2] - [3] - [4] - [5] - [6]