|
DIY Heat Sink Fan Spacer/Funnel This how-to article will teach you how to make your own HSF spacer/funnel in about 5 minutes or less. You will actually spend more time searching for the materials than you will actually building this. It’s a simple and effective cooling mod that I am sure you'll wish you had done sooner. Why funnel your HSF? Simple answer really. Cooling benefits. Your CPU builds up a tremendous amount of heat and relies on your heat sink and your heat sink’s fan to dissipate that heat in the most efficient way by design that it can. Now don’t get me wrong. There are a lot of excellent heat sinks and fans available that provide good cooling. This mod will enhance it. You will notice a little less noise with this mod as well, especially those of you using Deltas Okay, so we talked about the main benefit of better cooling that this mod will provide. But you are probably asking how does this benefit come to be? Every fan on the market creates a dead spot on the top of your heat sink. The fan’s hub or motor assembly causes that dead spot by not being able to move air over that area. There is really no way for manufactures to correct this and thus, we look for our own ways around it or live with it. Since we are modders, “live with it” is not an option. By putting a spacer/funnel between your fan and heat sink, you increase the distance between the two and give air a greater chance of contacting more surface area of the heat sink. This eliminates the dead spot entirely. The increased distance, or space, also will have a slight tornado effect when passing through the tunnel and hit the heat sink with a little more force. Although the temperature decrease may not be significant or justifiable to some people, others will appreciate a 2 to 5 degree difference. Especially if you overclock and use air-cooling. What you will need
What You Do
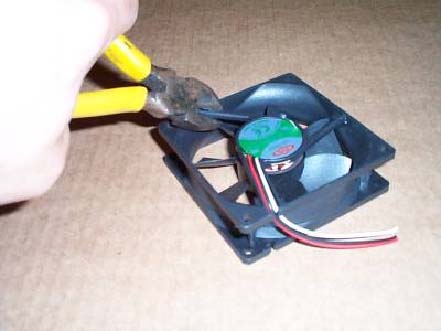
Take the spare fan you have selected and your wire cutters. First thing you need to do is remove the fan from the shell. Simply use the wire cutters to snip the braces that the hub is attached to. Snip them fairly close to the housing. The hub and blades will come out as one piece. Discard them and retain the shell for the next step.
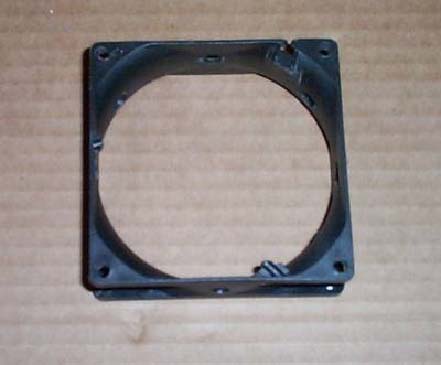
Here is what you should be left with after removing the hub and blades.
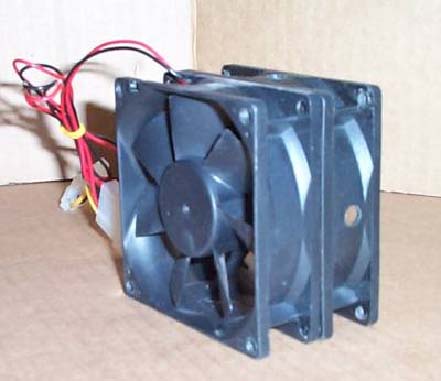
Last part of building is re-assembly. The fan shell you just “made” is placed between your original heat sink fan and your heat sink. Use the stove bolts to reattach this to your heat sink. In some cases you may notice vibration noise. This can be easily solved with small rubber washers placed between the fan shell and heat sink on all 4 corners. I recommend using higher cfm fans for this project. I have found using the Mechtronics 53cfm 80mm fan to produce excellent results. Using lower cfm fans in the low 40’s and high 30’s actually increase the temperature. - Article written by Built Ford Tough. |
|
Disclaimer: This how-to guide is presented for informative purposes only. CaseModGod.com can not and will not be held responsible for damages to or resulting from anything that you may decide to do to your case or hardware and also can not and will not be held responsible for injury to your self or others as a result of attempting any of the things that are shown on this site. Basically you are responsible for your own actions whether said actions were based on information garnered from this site or elsewhere, learn to deal with it. |