|
Hole Saw Modding - Cutting PC Blow Holes Coming to you directly from our "Mod Guides of the Lost" series... a guide covered within other guides or articles that you might have missed. You can use a Dremel or Nibbler to cut your blow holes but the fastest and most accurate way normally involves a hole saw, this guide covers the best way I have found to cut blow holes into metal, wood, Plexi-Glass and acrylic. Originally appearing in the "5 Dollar Window", "Modded Test PSU", "Modders Toolbox" and the "MOBY1 Bezel Guide" this 'new' guide explains the ins and outs of cutting holes in your computer. First up, what's needed...
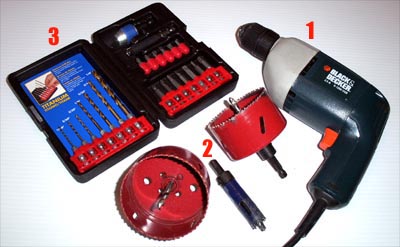
1 - A Drill - This drill is variable speed, reversible and has a keyless chuck... all features to look for when buying a good drill. My opinion is that cordless drills are not as good as corded for modding purposes, especially when cutting metal or using a hole saw. 2 - Hole Saws - The sizes I own are the most commonly used and are 80mm, 92mm and 3/4 inch. Hole saws consist of the hole saw, an arbor and a pilot bit. A hole saw is not a cheap tool ($20-$30) but they really make cutting blowholes simple. 3 - Drill Bits - Basically the more sizes and types of drill bit you have the better, there are bits made specifically for the different materials to be drilled and using the right bit for the job always makes things easier. 4 - Safety Glasses - Not pictured, needed nonetheless.
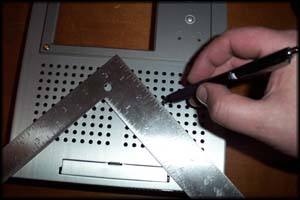
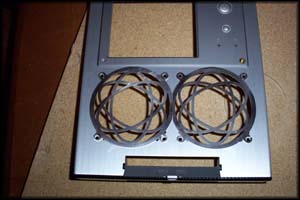
Cutting blowholes in metal... This mod is being performed on a Lian-Li case bezel in the absolute most difficult spot ever, using a hole saw on a surface with so many existing vent holes isn't easy so after this anything else should be. We need to find the center of the vent hole square, to do this I just lined up the corners and used the straight edge to get my lines. Then, using the scribing tool I traced the pencil X over and over until it formed a slight depression in the aluminum.
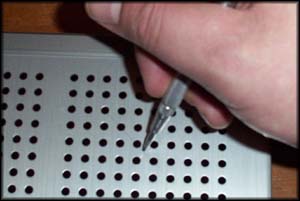
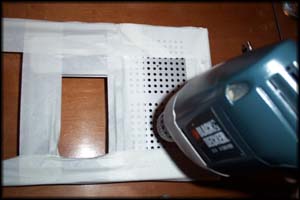
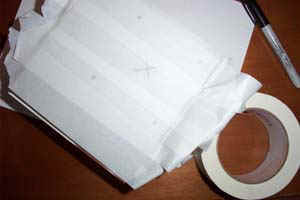
I covered the entire face of the bezel with masking tape to prevent scratches caused by metal filings and modding debris, masking tape is cheap protection and you should feel free to use it liberally. With the front completely covered it is time to drill a couple of pilot holes, a task that is no harder than lining up the bit with the scribed mark and drilling through.
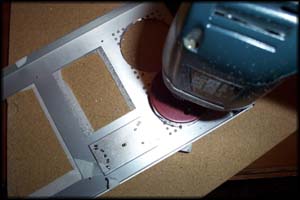
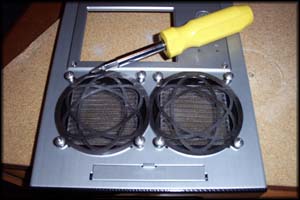
I drilled the pilot holes from the front of the bezel and used the hole saw on the back side with a variable speed drill and a 3 1/8" hole saw, which gives a very close to true 80mm hole. The inner edge of most laser cut fan grills will actually line up perfectly with the edge of the cut hole, if not you can use a file to clean things up. "Why not just use the dremel with a grinding wheel instead of the file?, I knew you would ask and the answer is control, a file offers a higher level of precision than a rotary tool and the hazards of slipping aren't nearly as great. Filing takes longer but the finished product is entirely worth it.
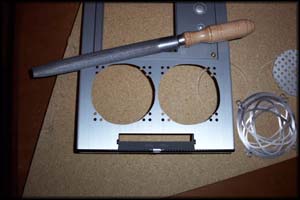
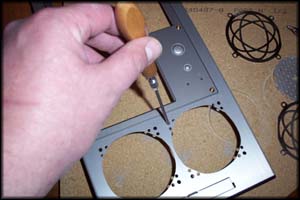
Throughout the filing process I would continually position the grills on the bezel to see what areas required further work, when I was happy with the cuts I held the grills in place and traced around the insides of the screw holes. I used a hobby file to size and position the screw holes, I didn't have to remove much material at all and if you use thread cutting screws you can actually get away with skipping this step, but it does make lining them up straight and screwing them in a bit harder.
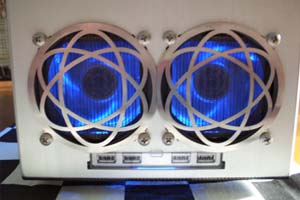
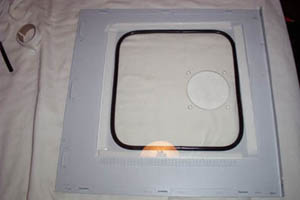
I put a couple of black anodized aluminum filters on the back side of the bezel and the atomic grills on top and screwed everything down, the final result looks pretty sweet.
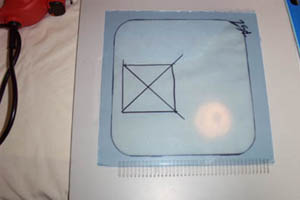
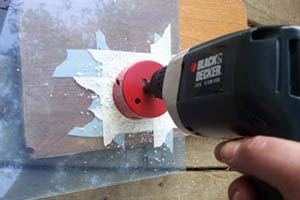
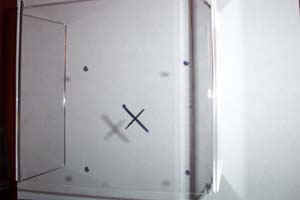
Using a hole saw to cut aluminum is easy, but if you are cutting a steel case you will want to use some 3-in-one oil or even motor oil to aid in cutting and to prevent burning up your drill. When using oil as a lubricant for cutting blow holes in steel remember that it is messy and you are guaranteed to spin off hot oil and metal shavings as you go, wear long pants and safety glasses to protect yourself. Cutting a window blowhole... I traced an 80mm fan onto the plexi with a Sharpie marker and made an X from corner to corner to get my center mark. Use masking tape on both sides of the plexi-glass making sure to extend a little beyond the traced outline of the fan. The masking tape adds strength to the window and will help to keep it from cracking when you drill a fan hole. Take your variable speed drill and 80mm (3 1/8”) hole saw and position it so that the pilot bit is on your center mark, slowly start drilling just until the bit goes completely through then stop. Flip the switch on the drill to reverse and start cutting the hole, going forward sometimes causes the hole saw to bind up and I have found going in reverse after the pilot is drilled through works a lot better and it seldom binds up. If the hole saw does bind up DO NOT rock it back and forth, doing so will almost always cause the plexi to crack.
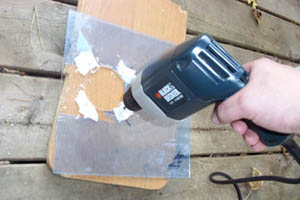
So you have a hole in the plexi, now you need holes for the screws to mount your fan. The best way to achieve this is to use the fan grill and set it upside down in the hole you just cut. Line it up straight and tape it down so it doesn’t move and mark the holes with the sharpie marker. Use the masking tape over your marks both front and back, they will show through the tape. I used a 7/32” drill bit which is larger than the screw holes for the fan, the reason for this is that it seldom lines up right the first try and makes it easier if it’s a little big. Also, most fan screws cut as you tighten them and if the holes are too small you could crack the plexi when you screw them in.
I use drill bits specifically for plastics (recommended) but if you do not have access to them you can rough up the tip of a normal bit with a file or even by scraping it against concrete to make it cut acrylic better. Slowly start drilling the screw holes and go just until you cut through, you will know when to stop as the plexi usually jumps up a bit when you make are there. Set the drill to reverse again and clean up the hole. Do the other three and then test it for fit using the fan. If it doesn’t line up perfect you can use the Dremel or a needle file to line the holes up better. Acrylic PSU cover blowhole... I used a Sharpie marker with a fan grill as a template to mark the screw holes onto the PSU cover and then took a ruler and went corner to corner using the dots I just made to find my center mark.
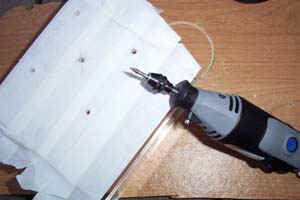
Next I masked off the acrylic cover on both sides, you should still be able to see the marker lines through it. Masking off the acrylic serves a dual purpose, first it helps prevent accidental scratches while you work on it and second it adds strength to the material to help prevent the acrylic from cracking when cutting and drilling. I used the dremel to drill the holes for the fan screws and also a center pilot hole for the hole saw, the better idea though is to get your center mark, cut the hole and then position the fan grill again to get the final screw location.
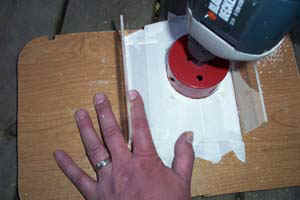
I carefully drilled out the 80mm hole for my top fan and have found that the best way to cut holes in acrylic is to start the cut with the hole saw going forward, just until the pilot bit is through and then cut the hole with the drill running in reverse. This works best if you have a piece of wood beneath the acrylic that you have already drilled the hole saw into as it makes a nice guide for a cleaner cut. Remember, don't cut your hole too fast or the acrylic can melt (very bad if melted acrylic cools and hardens on the hole saw) and don't apply too much downward force or the acrylic could crack. Happy Modding - Guide written by ARTbyTROY |
|