$5.00 Window Mod Guide
The Plan
I have seen a lot of pre-fabricated case modding store window kits and although
they are nice I thought to myself "I can do that myself for less than
$5.00". Whether my window is as good as a store bought kit I will leave to
you to decide, but one fact remains... mine is far less expensive than anything
you can buy in kit form.
The Parts
To accomplish this mod you will need automotive door edge molding,
Plexi-glass
and double sided tape. I purchased the two 27" lengths of black molding
from Carquest for $3.18, the double sided tape from Wal-mart for $1.47 and a
piece of 11"x11" scrap plexi-glass from Ace hardware for 25 cents.
Total cost of the window... $4.90. After buying the parts needed for the window
mod I got the idea of putting an Antec blue LED fan in the window and also
creating my own applique since I had the fan and ink jet window decal paper
already. *The fan and homemade applique are not included in the above mentioned
cost but still keep the cost well below $25.00 when included.
The Tools
For this mod I used a dremel, jigsaw, 80mm hole saw and a variable speed drill.
You will also need some masking tape, a marker, a ruler and most importantly
safety glasses. I cannot stress enough the need for safety glasses when modding,
all it takes is one tiny piece of metal flying at mach one off the edge of a cut
off wheel and hitting you in the eyeball to make you realize their importance.
Wal-mart sells them for $1.88 so if you don’t already own them this mod will
cost you $6.78.

The Job
The first thing to do is decide on the shape of the window. I was initially
going to make it round which meant I would just trace a dinner plate onto the
side panel but decided against it because I also wanted to use the LED fan.
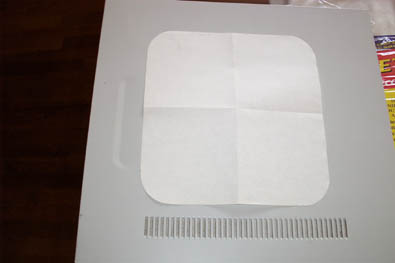
Instead I put a piece of paper on top of the piece of plexi-glass and cut it so
there was an inch or so of plexi showing on each side. I then folded the paper
in half and then in half again so that it was a square ¼ of its original size.
To get the rounded corners I placed a glass onto the corner edge of the folded
paper then traced the curve and cut it out with scissors.
Next I unfolded and taped the template down where I thought it would show off
the inside of the case best and traced around it with a sharpie marker. When
doing this remember to allow clearance for the inside case edges as you don’t
want the added thickness of the window to keep the door from going back on. I
also made note of the panel handle indent and bottom edge vent holes when
positioning the template because I wanted them to remain intact.
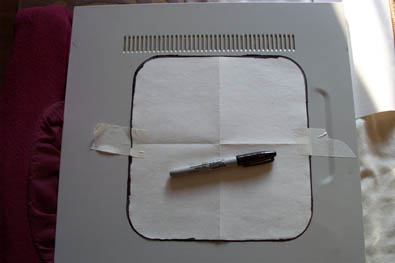
Remove the template and use a ruler and the sharpie to join up the lines where
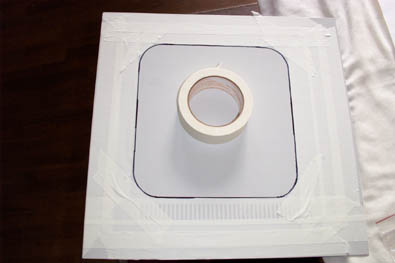
the tape was holding it down. Take the roll of masking tape and cover all but
the part of the panel to be cut out, this will help prevent scratching the door
when cutting out the window hole.
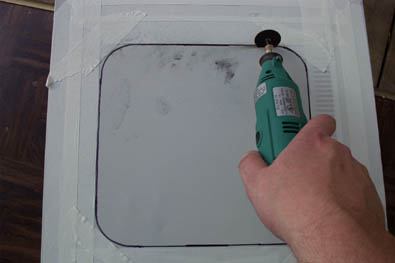
Put on your safety glasses and break out the dremel with a cut off wheel. I like
to start my cuts with a dremel but you could just as easily drill a pilot hole
and achieve about the same result, as far as that goes you could cut out the
entire window using the dremel but it is a terrific pain in the ass. Reinforced
cut off wheels for the dremel are expensive and it would take a few of them to
completely cut the hole, not to mention how long it would take compared to a
jigsaw.
Now that you have the cut started take the jigsaw with a metal cutting blade and
continue the cut, remember to slow down when you come to the rounded corners,
they are the easiest part to mess up. If you encounter problems rounding the
corners with the jigsaw you can do them with the dremel instead, but I highly
recommend using the jigsaw at least for the straight cuts.

|